Introduction
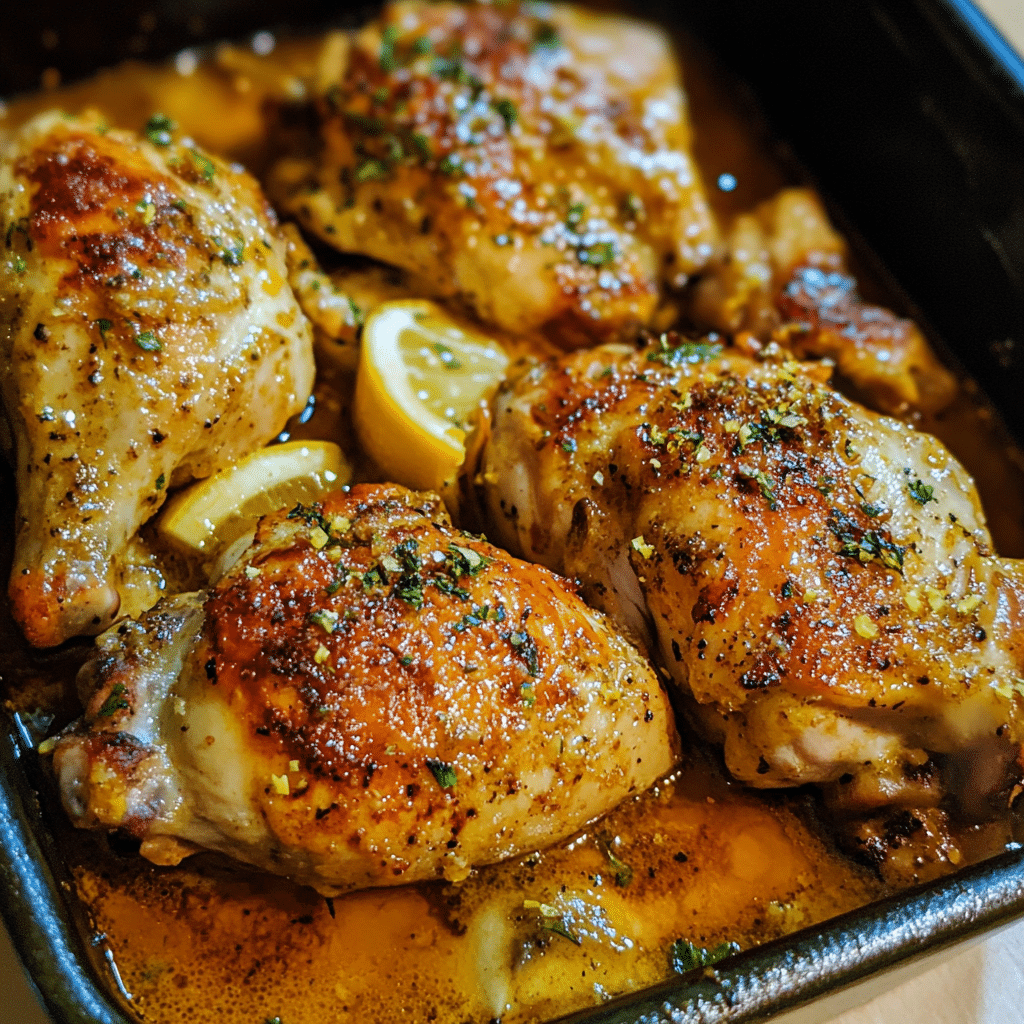
There’s something comforting about baked chicken legs. They’re juicy, crispy, and packed with flavor, making them the perfect meal for busy weeknights or a weekend family gathering. I can still remember the first time I made baked chicken legs for my family. I had just started experimenting in the kitchen, and my goal was to make something that would impress without being too complicated. When the chicken legs came out of the oven, golden and crispy, my family couldn’t get enough. That’s when I realized how magical chicken legs can be. Whether you’re cooking for one or a crowd, baked chicken legs are always a crowd-pleaser.
What I love most about this recipe is its simplicity. With just a few basic ingredients and minimal prep time, you can create a meal that feels like a real treat. The skin crisps up beautifully in the oven, while the meat stays juicy and tender on the inside. Add your favorite seasonings, and you’ve got a dish that can be easily customized to fit your taste preferences. This recipe is not only easy but also forgiving, which is perfect for those of us who are still getting comfortable in the kitchen. Plus, baked chicken legs are an affordable and versatile option that never fails to satisfy. Let’s dive into this recipe so you can make it tonight!
Why You’ll Love This Recipe
This baked chicken legs recipe has everything you could want: it’s easy to make, full of flavor, and perfect for any occasion. Let me share a few reasons why you’ll love it as much as I do:
Simple Ingredients: You probably already have most of the ingredients in your kitchen! No need to run to the store for specialty items.
Crispy, Flavorful Skin: The skin on these chicken legs turns wonderfully crispy and golden. The seasonings penetrate the skin, making each bite flavorful and satisfying.
Juicy Meat: The slow bake keeps the chicken meat moist and tender, while the outside crisps up to perfection.
Minimal Prep: This recipe doesn’t require hours of marinating or complicated techniques. You’ll have dinner in under an hour!
Versatile: Whether you want to go classic with garlic and herbs or spice things up with a little heat, the possibilities are endless.
Great for Leftovers: Chicken legs are perfect for meal prep, and they make for a delicious leftover lunch the next day.
Trust me, once you make this recipe, it’ll become a regular in your dinner rotation.
Preparation Time and Servings
Total Time: 40-45 minutes (including cooking time)
Servings: This recipe serves 4, but you can easily scale it up or down depending on how many people you’re feeding.
Nutrition Facts (per serving):
Calories: 300
Protein: 25g
Carbs: 5g
Fat: 20g
Fiber: 1g
These baked chicken legs are not only delicious but also a good source of protein!
Ingredients
For this baked chicken legs recipe, you’ll need just a few simple ingredients that pack a punch:
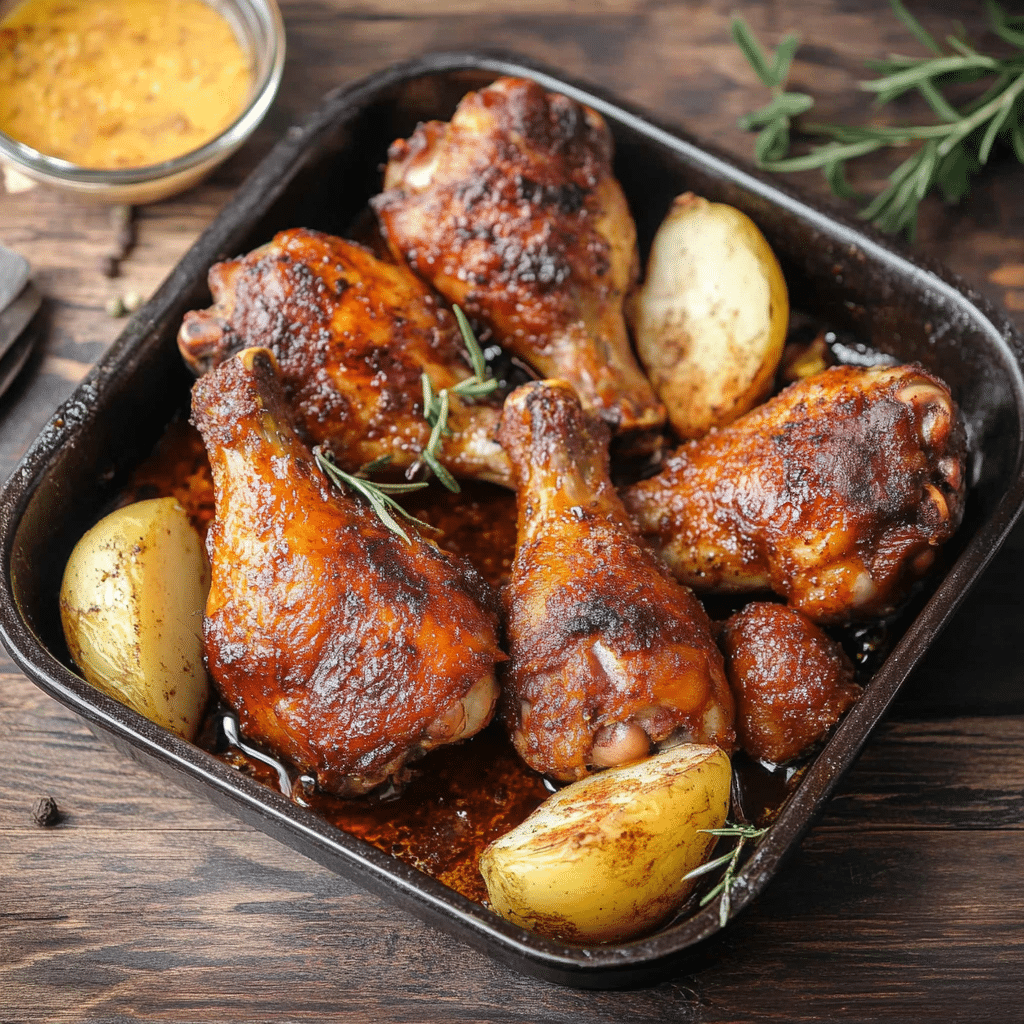
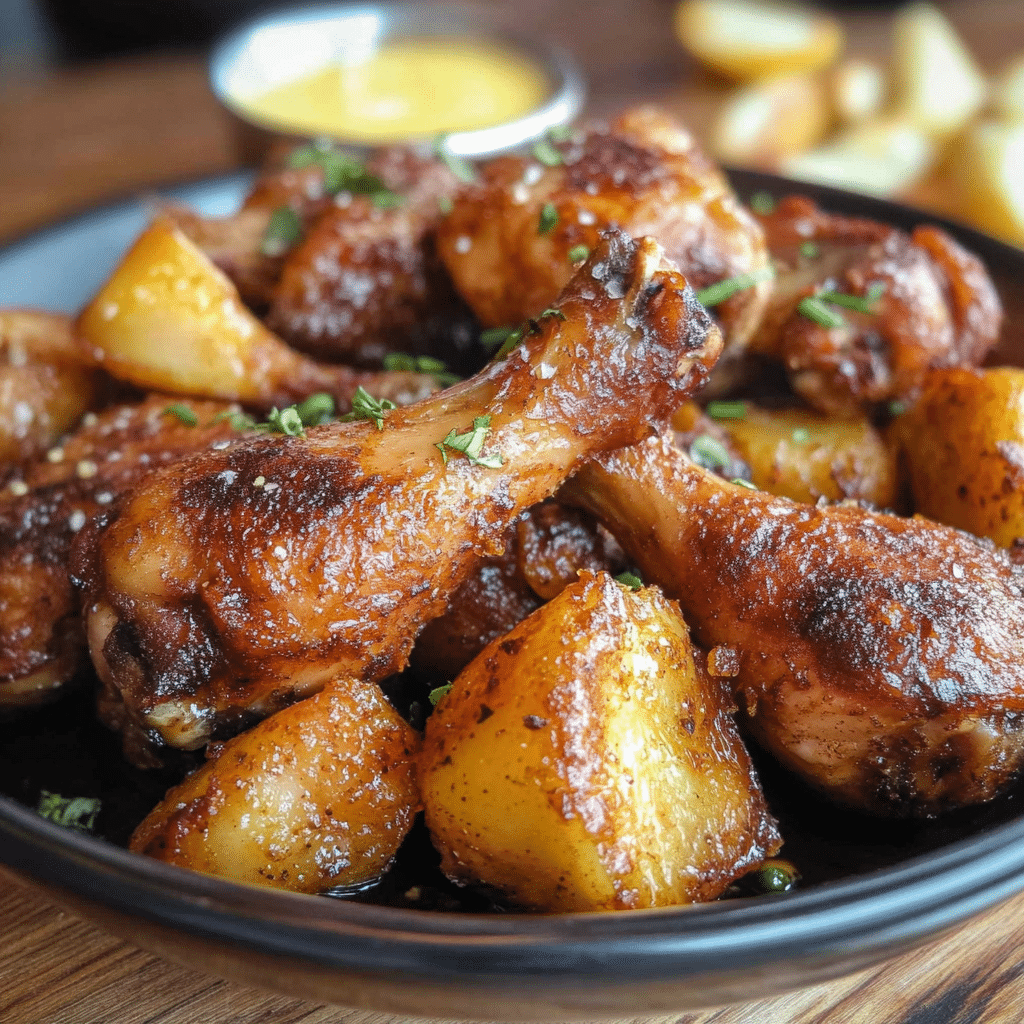
8 chicken legs (drumsticks): Chicken legs are ideal for baking because they’re affordable and flavorful. The skin crisps up beautifully while the meat stays tender.
2 tbsp olive oil: Olive oil helps the chicken skin crisp up in the oven while also keeping the meat moist.
2 tsp garlic powder: This adds a lovely savory depth to the chicken.
1 tsp onion powder: A must for that extra savory kick.
1 tsp paprika: Adds color and a mild, smoky flavor. If you prefer a bit of heat, opt for smoked paprika!
1 tsp dried thyme: A classic herb that pairs perfectly with chicken.
1 tsp dried oregano: Adds a subtle earthy flavor.
Salt and pepper: Essential for seasoning. Don’t be shy—season generously to ensure the chicken is flavorful.
Fresh parsley (optional): For garnish, this adds a pop of color and freshness.
Each of these ingredients brings something special to the dish. The olive oil ensures that the chicken doesn’t dry out, while the garlic, onion, and herbs elevate the flavor. The paprika gives a beautiful color and a subtle smokiness that everyone will love.
Step-by-Step Instructions
Now let’s get to the fun part! Follow these easy steps, and you’ll be enjoying your delicious baked chicken legs in no time.
- Preheat your oven to 400°F (200°C).
Before you do anything, get your oven preheating so it’s hot and ready when the chicken goes in. This high temperature is what helps the skin get crispy while keeping the meat juicy. - Prepare the chicken legs.
Place your chicken legs on a clean surface, like a cutting board or a large plate. Pat them dry with paper towels. This is an important step because moisture on the skin can prevent it from crisping up in the oven. You want the skin to be as dry as possible. - Season the chicken legs.
Drizzle the olive oil over the chicken legs and rub it in to coat them evenly. Now, sprinkle the garlic powder, onion powder, paprika, thyme, oregano, salt, and pepper all over the chicken. Make sure to coat them generously on all sides. Use your hands to rub the seasoning into the meat and skin for maximum flavor. - Arrange the chicken legs on a baking sheet.
Line a baking sheet with parchment paper or aluminum foil for easy cleanup. Arrange the chicken legs in a single layer, making sure they aren’t touching. This helps the chicken cook evenly and allows the skin to get crispy on all sides. - Bake in the preheated oven for 35-40 minutes.
Place the baking sheet in the oven and bake the chicken legs for 35-40 minutes, or until they’re golden brown and crispy on the outside. If you have a meat thermometer, check the internal temperature—it should reach 165°F (74°C). If you don’t have one, simply cut into one of the chicken legs at the thickest part to make sure the juices run clear and the meat is cooked through. - Optional: Broil for extra crispiness.
If you want to get your chicken legs extra crispy, you can switch your oven to the broil setting for the last 2-3 minutes of cooking. Keep a close eye on them so they don’t burn! - Let the chicken rest.
Once the chicken legs are done, take them out of the oven and let them rest for about 5 minutes. This allows the juices to redistribute, making the meat even more tender.
How to Serve
Now that your chicken legs are ready, here are a few ideas for how to serve them:
Serve with roasted vegetables: Roasted potatoes, carrots, and Brussels sprouts are the perfect side dishes for baked chicken legs. The caramelized veggies complement the savory chicken perfectly.
Pair with rice: A side of fluffy white rice, brown rice, or even quinoa works wonderfully with baked chicken legs. Add a drizzle of olive oil and a squeeze of lemon for extra flavor.
Top with fresh herbs: Garnish the chicken legs with a sprinkle of fresh parsley or basil to add a pop of color and a burst of freshness.
Serve with a salad: Pair your chicken with a fresh, crisp side salad. A simple arugula salad with a lemon vinaigrette would be the perfect balance to the richness of the chicken.
Additional Tips
Here are some tips to ensure your baked chicken legs turn out perfectly every time:
Pat the chicken dry: This is a key step in ensuring crispy skin. The drier the chicken, the crispier the skin will be.
Don’t overcrowd the pan: Leave space between each chicken leg so the heat can circulate and cook them evenly.
Use a wire rack: If you want your chicken legs to be extra crispy all around, place them on a wire rack set inside your baking sheet. This allows the heat to circulate under the chicken too.
Season generously: Chicken legs are meaty, so don’t be afraid to use enough seasoning. You want every bite to be packed with flavor.
Rest before serving: Letting the chicken rest after baking allows the juices to settle, making the meat more tender and flavorful.
Recipe Variations
This recipe is so versatile—you can easily customize it to suit your taste. Here are a few variations you can try:
Spicy Chicken Legs: Add some chili powder or red pepper flakes to the seasoning mix for a little heat. You can also toss the chicken legs in a spicy buffalo sauce after baking.
Honey Mustard Chicken Legs: For a tangy and sweet twist, mix some honey and Dijon mustard together and brush it on the chicken legs before baking.
Citrus Chicken Legs: Marinate the chicken in lemon or orange juice, garlic, and herbs for a bright, fresh flavor. Add some citrus zest to the seasoning mix for an extra zing!
Smoky BBQ Chicken Legs: Rub the chicken with your favorite BBQ seasoning before baking. Once cooked, brush with BBQ sauce for a smoky, tangy finish.
Freezing and Storage
If you happen to have leftovers, don’t worry! Baked chicken legs store beautifully.
Storage: Let the chicken legs cool completely before transferring them to an airtight container. Store them in the fridge for up to 3 days.
Freezing: To freeze the chicken legs, place them in a single layer on a baking sheet and freeze until solid. Then transfer them to a freezer-safe container or bag. They’ll stay fresh for up to 3 months. To reheat, bake from frozen at 350°F (175°C) for 20-25 minutes, or until heated through.
Special Equipment
While you can definitely make this recipe without any special tools, here are a few items that can make the process even easier:
Baking sheet with a wire rack: The wire rack allows air to circulate around the chicken, helping it cook evenly and become crispy all over.
Meat thermometer: This is optional but really helpful in ensuring your chicken is cooked through and safe to eat.
Parchment paper or aluminum foil: For easy cleanup, line your baking sheet with parchment paper or aluminum foil.
FAQ Section
Can I use chicken thighs instead of drumsticks? Yes! Chicken thighs will work perfectly in this recipe. Just adjust the cooking time since thighs might take a bit longer to cook than drumsticks.
Can I bake these chicken legs at a lower temperature? You can bake them at a lower temperature, but it might take a little longer for the skin to crisp up. I recommend baking at 350°F (175°C) for 45-50 minutes.
Can I marinate the chicken before baking? Absolutely! Marinating the chicken will add extra flavor. Just be sure to dry the chicken well before seasoning it to get that crispy skin.
Can I make these chicken legs in advance? Yes, you can prepare the chicken ahead of time and store it in the fridge for up to a day before baking. This is a great option for meal prep!
Print
Baked Chicken Legs Recipe
- Total Time: 45 minutes
Ingredients
For this baked chicken legs recipe, you’ll need just a few simple ingredients that pack a punch:
- 8 chicken legs (drumsticks): Chicken legs are ideal for baking because they’re affordable and flavorful. The skin crisps up beautifully while the meat stays tender.
- 2 tbsp olive oil: Olive oil helps the chicken skin crisp up in the oven while also keeping the meat moist.
- 2 tsp garlic powder: This adds a lovely savory depth to the chicken.
- 1 tsp onion powder: A must for that extra savory kick.
- 1 tsp paprika: Adds color and a mild, smoky flavor. If you prefer a bit of heat, opt for smoked paprika!
- 1 tsp dried thyme: A classic herb that pairs perfectly with chicken.
- 1 tsp dried oregano: Adds a subtle earthy flavor.
- Salt and pepper: Essential for seasoning. Don’t be shy—season generously to ensure the chicken is flavorful.
- Fresh parsley (optional): For garnish, this adds a pop of color and freshness.
Each of these ingredients brings something special to the dish. The olive oil ensures that the chicken doesn’t dry out, while the garlic, onion, and herbs elevate the flavor. The paprika gives a beautiful color and a subtle smokiness that everyone will love.
Instructions
Step-by-Step Instructions
Now let’s get to the fun part! Follow these easy steps, and you’ll be enjoying your delicious baked chicken legs in no time.
1. Preheat your oven to 400°F (200°C).
Before you do anything, get your oven preheating so it’s hot and ready when the chicken goes in. This high temperature is what helps the skin get crispy while keeping the meat juicy.
2. Prepare the chicken legs.
Place your chicken legs on a clean surface, like a cutting board or a large plate. Pat them dry with paper towels. This is an important step because moisture on the skin can prevent it from crisping up in the oven. You want the skin to be as dry as possible.
3. Season the chicken legs.
Drizzle the olive oil over the chicken legs and rub it in to coat them evenly. Now, sprinkle the garlic powder, onion powder, paprika, thyme, oregano, salt, and pepper all over the chicken. Make sure to coat them generously on all sides. Use your hands to rub the seasoning into the meat and skin for maximum flavor.
4. Arrange the chicken legs on a baking sheet.
Line a baking sheet with parchment paper or aluminum foil for easy cleanup. Arrange the chicken legs in a single layer, making sure they aren’t touching. This helps the chicken cook evenly and allows the skin to get crispy on all sides.
5. Bake in the preheated oven for 35-40 minutes.
Place the baking sheet in the oven and bake the chicken legs for 35-40 minutes, or until they’re golden brown and crispy on the outside. If you have a meat thermometer, check the internal temperature—it should reach 165°F (74°C). If you don’t have one, simply cut into one of the chicken legs at the thickest part to make sure the juices run clear and the meat is cooked through.
6. Optional: Broil for extra crispiness.
If you want to get your chicken legs extra crispy, you can switch your oven to the broil setting for the last 2-3 minutes of cooking. Keep a close eye on them so they don’t burn!
7. Let the chicken rest.
Once the chicken legs are done, take them out of the oven and let them rest for about 5 minutes. This allows the juices to redistribute, making the meat even more tender.
Nutrition
- Serving Size: 4
- Calories: 300
- Fat: 20g
- Carbohydrates: 5g
- Fiber: 1g
- Protein: 25g
Conclusion
I hope you’re as excited to make these baked chicken legs as I am! Whether you’re cooking for your family or preparing a quick dinner for yourself, this recipe is a winner every time. It’s simple, flavorful, and the perfect balance of crispy and juicy. Don’t forget to share your creations with me—I’d love to see how your chicken legs turn out! Tag me on social media, or leave a comment below to let me know how it went. Enjoy!