Introduction
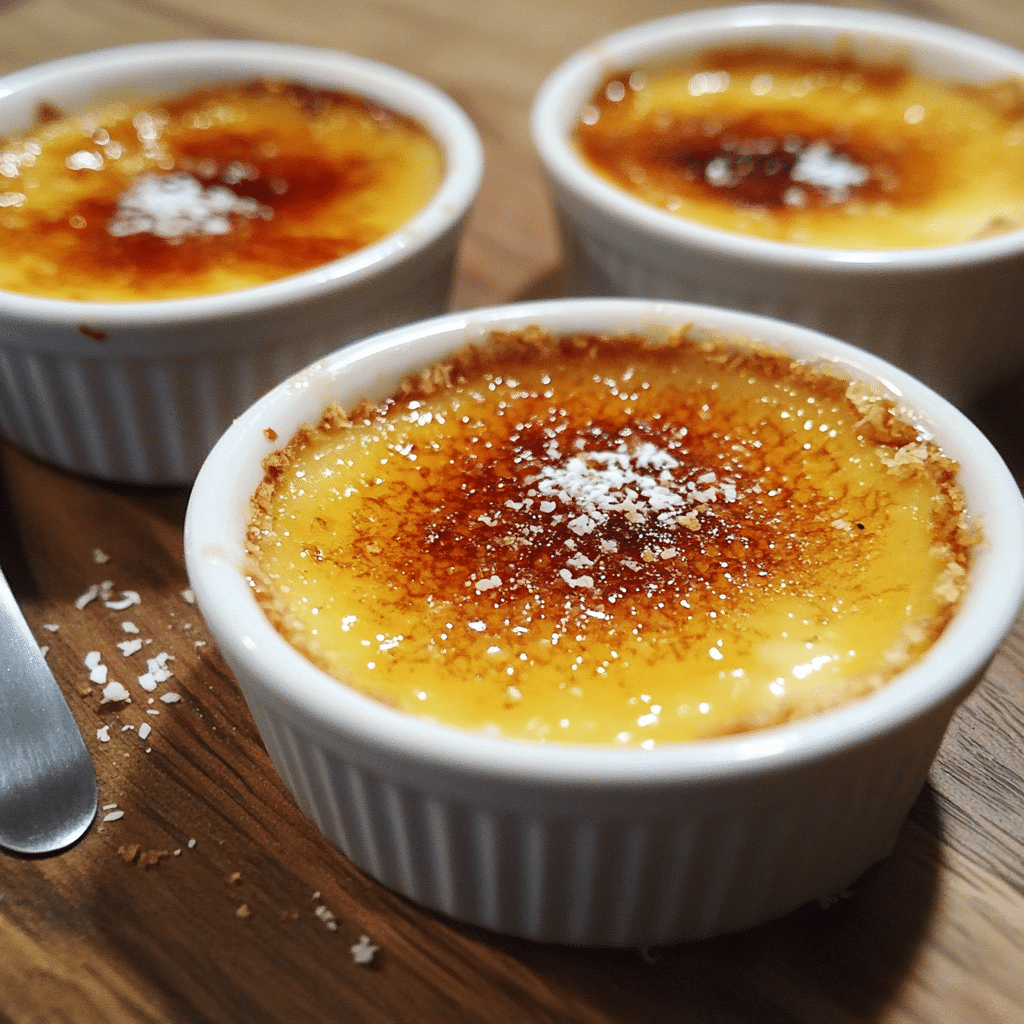
Crème brûlée is a beloved French dessert that has stood the test of time with its rich, velvety custard base and crispy, caramelized sugar topping. This indulgent treat is often enjoyed on special occasions, with its perfect balance of sweetness and sophistication. But what if you could give this classic dessert a tropical twist? Enter Coconut Crème Brûlée—a dreamy version that adds a creamy, coconut-infused flavor to the traditional recipe, taking your taste buds on a tropical journey with each bite.
Coconut Crème Brûlée combines the smoothness of custard with the exotic richness of coconut, all topped with a crackling layer of caramelized sugar. It’s a perfect fusion of French elegance and tropical delight that will surely impress your guests and satisfy your sweet tooth. Whether you’re hosting a dinner party, celebrating a holiday, or simply treating yourself to a special dessert, this Coconut Crème Brûlée is sure to elevate your dessert game.
In this article, we’ll explore why Coconut Crème Brûlée is a must-try dessert, walk you through step-by-step instructions on how to make it, and offer helpful tips for customizing it to suit your preferences. With a smooth coconut custard and a perfectly torched sugar topping, this dessert is guaranteed to become a favorite.
Why You’ll Love This Recipe
- Tropical Flavor: The addition of coconut milk and shredded coconut brings a tropical flair to the classic crème brûlée, making it a refreshing change from the traditional vanilla version.
- Rich and Creamy: The custard base is rich and smooth, with a perfect balance of sweetness and coconut flavor that melts in your mouth.
- Crispy, Caramelized Top: The signature crunchy layer of caramelized sugar gives each bite a satisfying contrast to the creamy custard.
- Visually Stunning: The beautiful golden-brown sugar crust creates a stunning visual presentation that will surely wow your guests.
- Customizable: This recipe is easily adaptable, so you can adjust the coconut flavor to your liking or even add your own twist, such as a hint of lime zest for a zesty tropical flair.
Preparation Time and Servings
- Total Time: 5 hours (30 minutes for prep, 1 hour for baking, 3-4 hours for chilling)
- Servings: This recipe makes about 6 servings, depending on the size of the ramekins.
- Nutrition Facts (per serving): Calories: 400, Protein: 6g, Carbs: 35g, Fat: 28g.
Ingredients
For the Coconut Custard:
- 2 cups heavy cream: Provides a rich, smooth texture for the custard base.
- 1 cup coconut milk: Adds the tropical coconut flavor and creaminess to the custard.
- 1/2 cup granulated sugar: Sweetens the custard and helps with the caramelization process.
- 6 large egg yolks: These provide structure and richness to the custard.
- 1 teaspoon vanilla extract: Enhances the flavor of the coconut and adds depth to the custard.
- 1/4 cup shredded unsweetened coconut: For added texture and coconut flavor.
- Pinch of salt: Balances the sweetness and enhances the coconut flavor.
For the Caramelized Sugar Topping:
- 1/4 cup granulated sugar: For creating the signature crispy, caramelized topping.
Optional Garnishes:
- Toasted coconut flakes: For extra crunch and visual appeal.
- Fresh fruit like pineapple or mango: To add a fresh contrast to the rich custard.
- Lime zest: For a touch of citrus that pairs beautifully with coconut.
Step-by-Step Preparation
FIRST STEP: PREPARE THE CUSTARD BASE
- Preheat the Oven: Begin by preheating your oven to 325°F (163°C). Place 6 small ramekins in a large baking dish or roasting pan. These will hold the custard during the baking process.
- Heat the Cream and Coconut Milk: In a medium saucepan, combine the heavy cream and coconut milk over medium heat. Stir occasionally and bring the mixture just to a simmer. Do not let it boil, as you want to avoid scalding the cream. Once it starts to simmer, remove it from the heat.
- Whisk the Egg Yolks and Sugar: While the cream mixture is heating, whisk the egg yolks and granulated sugar in a separate bowl. Whisk until the mixture becomes pale and thickened, which usually takes about 3-4 minutes. This step is crucial for creating the smooth texture of the custard.
- Temper the Eggs: Gradually pour a small amount of the hot cream mixture into the egg yolk mixture, whisking constantly. This is called tempering, and it helps prevent the eggs from curdling. Slowly add the rest of the cream mixture to the egg yolks, whisking continuously until fully combined.
- Add the Coconut Flakes and Vanilla: Stir in the shredded coconut, vanilla extract, and a pinch of salt. The shredded coconut will infuse the custard with flavor and give it a pleasant texture.
- Strain the Custard: To ensure the custard is silky smooth, pour the mixture through a fine-mesh strainer into a clean bowl or large measuring cup. This will remove any bits of cooked egg or coconut fibers that may have been left behind.
SECOND STEP: ASSEMBLE AND BAKE THE CUSTARD
- Pour the Custard into Ramekins: Carefully pour the custard mixture into the prepared ramekins, dividing it evenly between them. Leave a small gap at the top of each ramekin to allow room for the sugar topping later.
- Prepare the Water Bath: Fill the baking dish with hot water until it reaches halfway up the sides of the ramekins. This water bath, known as a bain-marie, ensures that the custard cooks evenly and gently, preventing it from curdling.
- Bake the Custard: Place the baking dish in the preheated oven and bake for about 50-60 minutes, or until the custard is set but still slightly wobbly in the center. You can check by gently shaking the ramekins—if the custard jiggles slightly in the center, it’s ready.
- Cool and Chill: Remove the ramekins from the water bath and allow them to cool to room temperature. Once they have cooled, cover them with plastic wrap and refrigerate for at least 3-4 hours, or preferably overnight, to allow the flavors to meld and the custard to fully set.
THIRD STEP: CARAMELIZE THE SUGAR TOPPING
- Sprinkle the Sugar: Once the custards have chilled and are ready to serve, sprinkle a thin, even layer of granulated sugar over the surface of each custard. Be sure to cover the entire surface but avoid adding too much sugar, as it can affect the caramelization process.
- Caramelize the Sugar: Using a kitchen torch, gently heat the sugar until it melts and turns golden brown. Move the flame in small circles over the surface to ensure even caramelization. The sugar should form a crispy, glass-like topping.
- Cool the Sugar: Allow the sugar to cool and harden for a minute or two before serving. This will create that signature crunchy layer on top of the creamy custard.
FINAL STEP: GARNISH AND SERVE
- Add Garnishes: For added flavor and visual appeal, sprinkle toasted coconut flakes on top of the crème brûlée. You can also add a touch of lime zest for a fresh, zesty contrast, or serve with fresh fruit like pineapple or mango for a tropical twist.
- Serve and Enjoy: Serve the Coconut Crème Brûlée immediately after caramelizing the sugar, and enjoy the delightful combination of creamy coconut custard and crunchy, caramelized sugar.
How to Serve Coconut Crème Brûlée
Coconut Crème Brûlée is a sophisticated and indulgent dessert that’s perfect for a variety of occasions. Here are some great ways to serve it:
1. As a Special Occasion Dessert
This dessert is perfect for special celebrations, whether it’s a birthday, anniversary, or holiday gathering. The tropical coconut twist adds an exciting flair to the traditional crème brûlée, making it a memorable treat for your guests.
2. Pair with Tropical Drinks
To enhance the tropical flavors of the crème brûlée, serve it with refreshing drinks like coconut water, a tropical fruit punch, or a classic piña colada mocktail.
3. Serve with Fresh Fruit
To balance the richness of the custard, serve Coconut Crème Brûlée with fresh fruit like strawberries, passionfruit, or kiwi. The acidity of the fruit will provide a refreshing contrast to the sweetness of the dessert.
4. As a Light After-Dinner Treat
Despite its richness, Coconut Crème Brûlée is a great way to end a meal. Its light coconut flavor makes it an ideal choice for those who prefer something less heavy than traditional chocolate or fruit-based desserts.
Additional Tips
- Make Ahead: Coconut Crème Brûlée can be made ahead of time. Once the custard is prepared and chilled, you can store it in the fridge for up to 2 days before caramelizing the sugar and serving.
- Customizing Coconut Flavor: If you prefer a stronger coconut flavor, increase the amount of shredded coconut or use full-fat coconut milk instead of the regular coconut milk for a richer taste.
- Creating the Perfect Caramelized Top: If you don’t have a kitchen torch, you can caramelize the sugar under the broiler. Just be sure to watch carefully to avoid burning the sugar.
- Gluten-Free: This recipe is naturally gluten-free, making it an excellent option for those with gluten sensitivities or those following a gluten-free diet.
Recipe Variations
While Coconut Crème Brûlée is fantastic as written, there are a few variations you can try to customize the recipe:
1. Add a Zesty Twist
For a refreshing contrast to the coconut, add a teaspoon of lime zest or orange zest to the custard base. The citrusy notes will complement the tropical coconut flavor beautifully.
2. Add a Hint of Chocolate
For a coconut-chocolate fusion, add 1/4 cup of finely chopped dark chocolate to the custard mixture. The chocolate will melt into the custard as it bakes, creating a rich and indulgent flavor.
3. Coconut-Lime Crème Brûlée
For a more vibrant tropical flavor, try using a combination of coconut milk and lime juice in the custard base. This will give the crème brûlée a zesty, tropical flavor that’s perfect for summer.
Freezing and Storage
While crème brûlée is best served fresh, you can store leftovers in the refrigerator for up to 2 days. Once the sugar has been caramelized, it’s best to eat the dessert soon after, as the sugar topping will lose its crunch over time.
To store the custard without the sugar topping, simply cover the ramekins with plastic wrap and refrigerate. When ready to serve, caramelize the sugar and garnish as desired.
Print
Coconut Crème Brûlée
- Total Time: 5 hours
Ingredients
For the Coconut Custard:
- 2 cups heavy cream: Provides a rich, smooth texture for the custard base.
- 1 cup coconut milk: Adds the tropical coconut flavor and creaminess to the custard.
- 1/2 cup granulated sugar: Sweetens the custard and helps with the caramelization process.
- 6 large egg yolks: These provide structure and richness to the custard.
- 1 teaspoon vanilla extract: Enhances the flavor of the coconut and adds depth to the custard.
- 1/4 cup shredded unsweetened coconut: For added texture and coconut flavor.
- Pinch of salt: Balances the sweetness and enhances the coconut flavor.
For the Caramelized Sugar Topping:
- 1/4 cup granulated sugar: For creating the signature crispy, caramelized topping.
Optional Garnishes:
- Toasted coconut flakes: For extra crunch and visual appeal.
- Fresh fruit like pineapple or mango: To add a fresh contrast to the rich custard.
- Lime zest: For a touch of citrus that pairs beautifully with coconut.
Instructions
FIRST STEP: PREPARE THE CUSTARD BASE
- Preheat the Oven: Begin by preheating your oven to 325°F (163°C). Place 6 small ramekins in a large baking dish or roasting pan. These will hold the custard during the baking process.
- Heat the Cream and Coconut Milk: In a medium saucepan, combine the heavy cream and coconut milk over medium heat. Stir occasionally and bring the mixture just to a simmer. Do not let it boil, as you want to avoid scalding the cream. Once it starts to simmer, remove it from the heat.
- Whisk the Egg Yolks and Sugar: While the cream mixture is heating, whisk the egg yolks and granulated sugar in a separate bowl. Whisk until the mixture becomes pale and thickened, which usually takes about 3-4 minutes. This step is crucial for creating the smooth texture of the custard.
- Temper the Eggs: Gradually pour a small amount of the hot cream mixture into the egg yolk mixture, whisking constantly. This is called tempering, and it helps prevent the eggs from curdling. Slowly add the rest of the cream mixture to the egg yolks, whisking continuously until fully combined.
- Add the Coconut Flakes and Vanilla: Stir in the shredded coconut, vanilla extract, and a pinch of salt. The shredded coconut will infuse the custard with flavor and give it a pleasant texture.
- Strain the Custard: To ensure the custard is silky smooth, pour the mixture through a fine-mesh strainer into a clean bowl or large measuring cup. This will remove any bits of cooked egg or coconut fibers that may have been left behind.
SECOND STEP: ASSEMBLE AND BAKE THE CUSTARD
- Pour the Custard into Ramekins: Carefully pour the custard mixture into the prepared ramekins, dividing it evenly between them. Leave a small gap at the top of each ramekin to allow room for the sugar topping later.
- Prepare the Water Bath: Fill the baking dish with hot water until it reaches halfway up the sides of the ramekins. This water bath, known as a bain-marie, ensures that the custard cooks evenly and gently, preventing it from curdling.
- Bake the Custard: Place the baking dish in the preheated oven and bake for about 50-60 minutes, or until the custard is set but still slightly wobbly in the center. You can check by gently shaking the ramekins—if the custard jiggles slightly in the center, it’s ready.
- Cool and Chill: Remove the ramekins from the water bath and allow them to cool to room temperature. Once they have cooled, cover them with plastic wrap and refrigerate for at least 3-4 hours, or preferably overnight, to allow the flavors to meld and the custard to fully set.
THIRD STEP: CARAMELIZE THE SUGAR TOPPING
- Sprinkle the Sugar: Once the custards have chilled and are ready to serve, sprinkle a thin, even layer of granulated sugar over the surface of each custard. Be sure to cover the entire surface but avoid adding too much sugar, as it can affect the caramelization process.
- Caramelize the Sugar: Using a kitchen torch, gently heat the sugar until it melts and turns golden brown. Move the flame in small circles over the surface to ensure even caramelization. The sugar should form a crispy, glass-like topping.
- Cool the Sugar: Allow the sugar to cool and harden for a minute or two before serving. This will create that signature crunchy layer on top of the creamy custard.
FINAL STEP: GARNISH AND SERVE
- Add Garnishes: For added flavor and visual appeal, sprinkle toasted coconut flakes on top of the crème brûlée. You can also add a touch of lime zest for a fresh, zesty contrast, or serve with fresh fruit like pineapple or mango for a tropical twist.
- Serve and Enjoy: Serve the Coconut Crème Brûlée immediately after caramelizing the sugar, and enjoy the delightful combination of creamy coconut custard and crunchy, caramelized sugar.
Nutrition
- Serving Size: 6
- Calories: 400
- Fat: 28g
- Carbohydrates: 35
- Protein: 6g
Conclusion
Coconut Crème Brûlée is the ultimate fusion of classic French dessert and tropical flavor. With its creamy, coconut-infused custard and crispy, caramelized sugar topping, it’s a decadent treat that’s perfect for any occasion. Whether you’re serving it at a special gathering or simply indulging in a sweet tropical escape, this dessert is sure to impress. Try it today, and enjoy the irresistible blend of rich coconut flavor and smooth, velvety custard in every bite.