Introduction
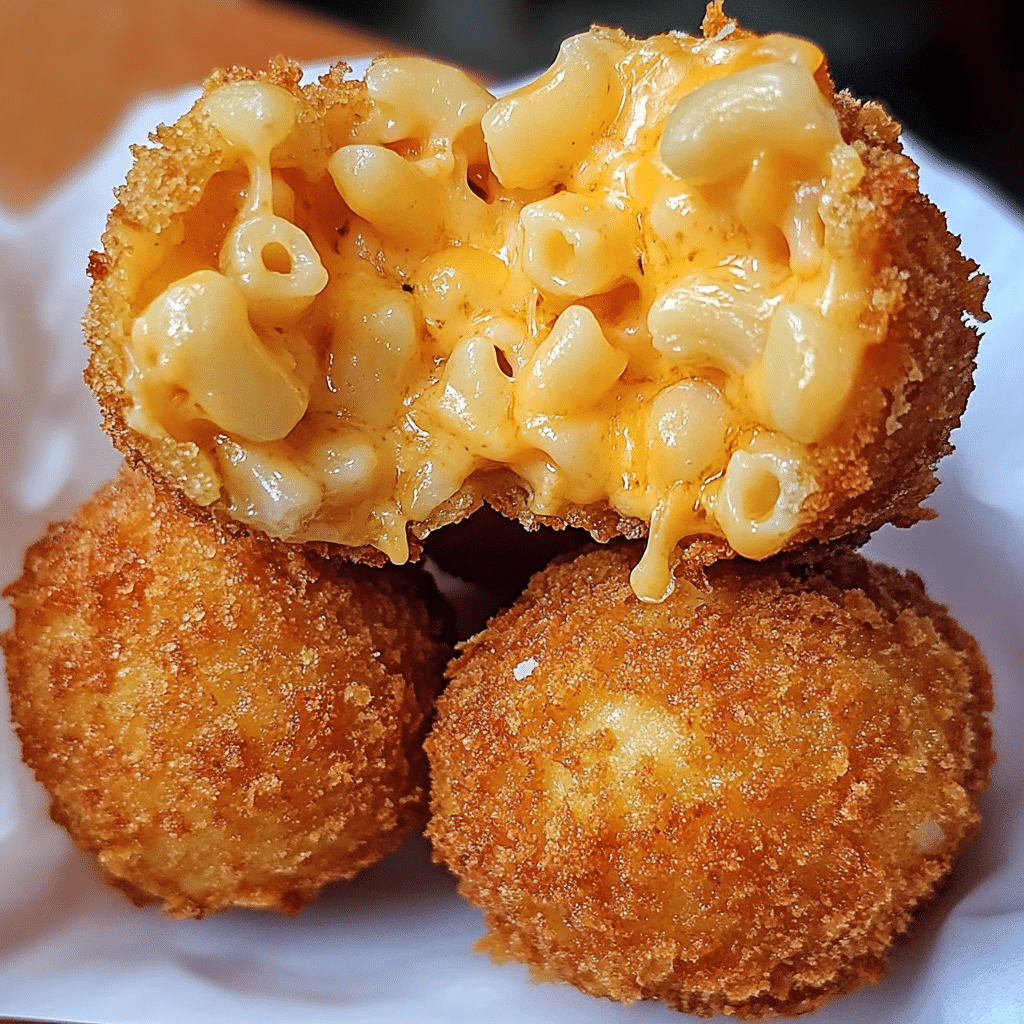
Fried Mac and Cheese Balls are the ultimate comfort food that combines two beloved dishes—macaroni and cheese and crispy fried goodness. These bite-sized treats are packed with creamy, cheesy macaroni surrounded by a perfectly golden and crunchy exterior. Whether you’re serving them as an appetizer, snack, or party food, Fried Mac and Cheese Balls are sure to be a hit. The best part? You can make them ahead of time and store them in the fridge or freezer for easy snacking whenever you want.
This recipe is a crowd-pleaser, especially for cheese lovers, as it delivers a satisfying combination of gooey cheese and crispy crunch in every bite. And since they are made without pork, bacon, wine, or alcohol, they’re perfect for those who follow Halal dietary practices, making these Mac and Cheese Balls a guilt-free indulgence!
Perfect for:
- Party appetizers
- Game day snacks
- Kid-friendly meals
- Potlucks and gatherings
- Comfort food lovers
Why You’ll Love This Fried Mac and Cheese Balls Recipe
Here’s why Fried Mac and Cheese Balls will quickly become one of your go-to recipes:
- Cheesy and Creamy Center: These fried balls are loaded with rich, creamy mac and cheese, offering a comforting bite with every mouthful.
- Golden, Crispy Coating: The crispy, golden outer crust adds a satisfying crunch that contrasts beautifully with the soft, gooey inside.
- Easy to Make: While the recipe may look fancy, it’s simple to make with just a few ingredients and a quick fry in hot oil.
- Perfect for Any Occasion: Whether you’re hosting a party, looking for a snack, or feeding the kids, these mac and cheese balls are versatile and sure to impress.
- Halal-Friendly: Made with halal ingredients, these Mac and Cheese Balls are a delicious treat suitable for everyone, with no pork, bacon, or alcohol involved.
Preparation and Cooking Time
- Total Time: 1 hour 15 minutes
- Preparation Time: 30 minutes
- Chilling Time: 30 minutes
- Cooking Time: 15 minutes
- Servings: 16-20 mac and cheese balls
- Calories per Serving: Approximately 100-150 calories (varies based on size and ingredients)
- Key Nutrients: Protein: 5g, Carbs: 10g, Fat: 6g
Ingredients
Here’s what you’ll need to make these irresistible Fried Mac and Cheese Balls:
For the Mac and Cheese:
- 2 cups elbow macaroni (or any pasta of your choice)
- 2 cups shredded cheddar cheese (or a mix of mozzarella and cheddar)
- 1 cup milk (whole milk or plant-based milk)
- 2 tablespoons unsalted butter
- 2 tablespoons all-purpose flour
- ½ teaspoon salt
- ¼ teaspoon black pepper
- ½ teaspoon garlic powder (optional)
- ¼ teaspoon onion powder (optional)
- 1 tablespoon Dijon mustard (optional, for extra flavor)
For the Coating:
- 1 cup breadcrumbs (panko breadcrumbs work great for extra crunch)
- 1 large egg, beaten
- ½ cup all-purpose flour (for dredging)
- Salt and pepper to taste
- Vegetable or canola oil (for frying)
Ingredient Highlights
- Cheddar Cheese: Sharp cheddar gives the mac and cheese its rich, savory flavor. You can mix it with mozzarella for extra stretchiness.
- Butter and Flour: These ingredients make a simple roux, which helps thicken the cheese sauce and gives the mac and cheese its creamy texture.
- Panko Breadcrumbs: Panko provides a lighter, crispier coating that fries up beautifully. It’s a great alternative to regular breadcrumbs for an extra crunchy texture.
- Dijon Mustard: This optional addition adds a tangy kick to the mac and cheese filling, balancing the richness of the cheese.
Step-by-Step Instructions
Follow these simple steps to make perfect Fried Mac and Cheese Balls:
Prepare the Mac and Cheese:
- Cook the Macaroni: Boil a pot of salted water and cook the elbow macaroni (or pasta of choice) according to the package instructions. Drain and set aside.
- Make the Cheese Sauce: In a large saucepan, melt the butter over medium heat. Once melted, add the flour and whisk continuously for 1-2 minutes to form a smooth roux. Gradually add the milk, whisking constantly to avoid lumps. Season with salt, pepper, garlic powder, onion powder, and Dijon mustard (if using). Continue to cook and stir until the mixture thickens.
- Add the Cheese: Once the sauce has thickened, remove it from the heat and stir in the shredded cheese until it’s completely melted and smooth. Adjust the seasoning if needed.
- Combine the Mac and Cheese: Add the cooked pasta to the cheese sauce and stir until the pasta is well-coated. Let the mac and cheese cool to room temperature.
Form the Mac and Cheese Balls:
- Chill the Mixture: Once the mac and cheese has cooled to room temperature, cover it and place it in the fridge for about 30 minutes. This will help the mixture firm up, making it easier to form into balls.
- Form the Balls: After chilling, use your hands or a small cookie scoop to form the mac and cheese mixture into bite-sized balls (about 1 inch in diameter). Set the balls on a parchment-lined tray or plate.
Coat the Mac and Cheese Balls:
- Dredge the Balls: Prepare a dredging station with three shallow bowls. In the first bowl, add the flour and season with a pinch of salt and pepper. In the second bowl, beat the egg. In the third bowl, add the panko breadcrumbs. Coat each mac and cheese ball in the flour first, then dip in the beaten egg, and finally coat with the panko breadcrumbs, pressing gently to make sure the breadcrumbs stick.
Fry the Mac and Cheese Balls:
- Heat the Oil: In a deep frying pan or a pot, heat about 2 inches of vegetable or canola oil over medium-high heat. To test if the oil is hot enough, drop in a small piece of bread—if it sizzles and turns golden brown, the oil is ready.
- Fry the Balls: Carefully add the mac and cheese balls to the hot oil, frying in batches to avoid overcrowding. Fry for about 2-3 minutes per batch, or until the balls are golden brown and crispy on all sides.
- Drain and Cool: Use a slotted spoon to remove the balls from the oil and place them on a paper towel-lined plate to drain excess oil. Repeat until all the mac and cheese balls are fried.
Serve the Fried Mac and Cheese Balls:
- Serve Hot: Serve the mac and cheese balls immediately while they’re still warm and crispy. They can be enjoyed on their own or paired with your favorite dipping sauces like marinara, ranch, or a spicy buffalo sauce.
How to Serve Fried Mac and Cheese Balls
Fried Mac and Cheese Balls are a versatile snack that can be served in many ways:
- With Dipping Sauces: Serve them with marinara, ranch dressing, honey mustard, or buffalo sauce for an extra burst of flavor.
- As an Appetizer: These make a perfect appetizer at parties, game nights, or family gatherings. They’re always a crowd favorite!
- For Lunch or Dinner: Pair with a side salad, some vegetables, or even a light soup for a complete meal.
- For Kids: These bite-sized treats are kid-friendly, making them an excellent choice for school lunches or family dinners.
Additional Tips for Fried Mac and Cheese Balls
Here are some tips to make your Fried Mac and Cheese Balls even better:
- Use Cold Mac and Cheese: Be sure to chill the mac and cheese before forming the balls. The colder the mixture, the easier it will be to handle and shape.
- Don’t Skip the Coating: The crispy panko coating is what gives these mac and cheese balls their signature crunch, so don’t skip the dredging step!
- Fry in Batches: Don’t overcrowd the frying pan. Fry the mac and cheese balls in batches to ensure even cooking and prevent them from sticking together.
- Serve Immediately: Fried Mac and Cheese Balls are best served fresh and warm. The cheese inside is gooey and melty, so serve them as soon as they’re fried.
Recipe Variations for Fried Mac and Cheese Balls
Here are 5 variations of Fried Mac and Cheese Balls that you can try:
- Buffalo Mac and Cheese Balls: Add a few tablespoons of buffalo sauce to the mac and cheese mixture for a spicy, tangy flavor. Serve with a side of ranch dressing.
- Bacon Mac and Cheese Balls: For non-Halal versions, you can add crispy bacon pieces to the mac and cheese mixture. However, for a Halal option, substitute with turkey bacon or halal chicken bacon.
- Spicy Jalapeño Mac and Cheese Balls: Add finely chopped jalapeños or chili flakes to the mac and cheese for a spicy kick.
- Cheddar and Mozzarella Mac and Cheese Balls: Mix mozzarella cheese with cheddar for an even stretchier, gooier filling.
- Vegetarian Mac and Cheese Balls: For a vegetarian version, add finely chopped spinach, broccoli, or mushrooms to the mac and cheese mixture for extra flavor and texture.
Freezing and Storage for Fried Mac and
Cheese Balls
- Freezing: You can freeze uncooked mac and cheese balls for up to 3 months. Once formed, place them on a baking sheet and freeze them until solid. Afterward, transfer them to an airtight container or freezer bag. When ready to cook, fry them straight from the freezer—no need to thaw.
- Storage: Store leftover fried mac and cheese balls in an airtight container in the fridge for up to 3 days. Reheat them in the oven for a crispy texture, or microwave them for a quicker option (though they may lose some crispiness).
Special Equipment for Fried Mac and Cheese Balls
Here are some special equipment items you might need to make Fried Mac and Cheese Balls:
- Deep Fryer or Frying Pan: A deep fryer or a large frying pan is essential for frying the mac and cheese balls to a crispy, golden perfection.
- Slotted Spoon: A slotted spoon helps remove the balls from the hot oil without draining away too much oil.
- Cookie Scoop or Ice Cream Scoop: This helps form evenly-sized mac and cheese balls quickly.
- Cooling Rack: A cooling rack allows air to circulate around the balls as they drain, keeping them crisp.
FAQ Section about Fried Mac and Cheese Balls
- Can I make these mac and cheese balls ahead of time?
Yes, you can make the mac and cheese mixture ahead of time and store it in the fridge. Form the balls, chill, then coat and fry them when you’re ready. - Can I bake these instead of frying?
Yes, for a lighter version, you can bake the mac and cheese balls in a preheated oven at 400°F (200°C) for 15-20 minutes, or until golden brown and crispy. - Can I make these gluten-free?
Yes, you can substitute regular breadcrumbs with gluten-free panko breadcrumbs, and use gluten-free all-purpose flour for the dredging. - Can I add other types of cheese?
Absolutely! You can use any cheese you like. Gouda, fontina, or even pepper jack can make these balls extra cheesy and flavorful.

Fried Mac and Cheese Balls
- Total Time: 1 hour
Ingredients
For the Mac and Cheese:
- 2 cups elbow macaroni (or any pasta of your choice)
- 2 cups shredded cheddar cheese (or a mix of mozzarella and cheddar)
- 1 cup milk (whole milk or plant-based milk)
- 2 tablespoons unsalted butter
- 2 tablespoons all-purpose flour
- ½ teaspoon salt
- ¼ teaspoon black pepper
- ½ teaspoon garlic powder (optional)
- ¼ teaspoon onion powder (optional)
- 1 tablespoon Dijon mustard (optional, for extra flavor)
For the Coating:
- 1 cup breadcrumbs (panko breadcrumbs work great for extra crunch)
- 1 large egg, beaten
- ½ cup all-purpose flour (for dredging)
- Salt and pepper to taste
- Vegetable or canola oil (for frying)
Ingredient Highlights
- Cheddar Cheese: Sharp cheddar gives the mac and cheese its rich, savory flavor. You can mix it with mozzarella for extra stretchiness.
- Butter and Flour: These ingredients make a simple roux, which helps thicken the cheese sauce and gives the mac and cheese its creamy texture.
- Panko Breadcrumbs: Panko provides a lighter, crispier coating that fries up beautifully. It’s a great alternative to regular breadcrumbs for an extra crunchy texture.
- Dijon Mustard: This optional addition adds a tangy kick to the mac and cheese filling, balancing the richness of the cheese.
Instructions
Prepare the Mac and Cheese:
- Cook the Macaroni: Boil a pot of salted water and cook the elbow macaroni (or pasta of choice) according to the package instructions. Drain and set aside.
- Make the Cheese Sauce: In a large saucepan, melt the butter over medium heat. Once melted, add the flour and whisk continuously for 1-2 minutes to form a smooth roux. Gradually add the milk, whisking constantly to avoid lumps. Season with salt, pepper, garlic powder, onion powder, and Dijon mustard (if using). Continue to cook and stir until the mixture thickens.
- Add the Cheese: Once the sauce has thickened, remove it from the heat and stir in the shredded cheese until it’s completely melted and smooth. Adjust the seasoning if needed.
- Combine the Mac and Cheese: Add the cooked pasta to the cheese sauce and stir until the pasta is well-coated. Let the mac and cheese cool to room temperature.
Form the Mac and Cheese Balls:
- Chill the Mixture: Once the mac and cheese has cooled to room temperature, cover it and place it in the fridge for about 30 minutes. This will help the mixture firm up, making it easier to form into balls.
- Form the Balls: After chilling, use your hands or a small cookie scoop to form the mac and cheese mixture into bite-sized balls (about 1 inch in diameter). Set the balls on a parchment-lined tray or plate.
Coat the Mac and Cheese Balls:
- Dredge the Balls: Prepare a dredging station with three shallow bowls. In the first bowl, add the flour and season with a pinch of salt and pepper. In the second bowl, beat the egg. In the third bowl, add the panko breadcrumbs. Coat each mac and cheese ball in the flour first, then dip in the beaten egg, and finally coat with the panko breadcrumbs, pressing gently to make sure the breadcrumbs stick.
Fry the Mac and Cheese Balls:
- Heat the Oil: In a deep frying pan or a pot, heat about 2 inches of vegetable or canola oil over medium-high heat. To test if the oil is hot enough, drop in a small piece of bread—if it sizzles and turns golden brown, the oil is ready.
- Fry the Balls: Carefully add the mac and cheese balls to the hot oil, frying in batches to avoid overcrowding. Fry for about 2-3 minutes per batch, or until the balls are golden brown and crispy on all sides.
- Drain and Cool: Use a slotted spoon to remove the balls from the oil and place them on a paper towel-lined plate to drain excess oil. Repeat until all the mac and cheese balls are fried.
Serve the Fried Mac and Cheese Balls:
- Serve Hot: Serve the mac and cheese balls immediately while they’re still warm and crispy. They can be enjoyed on their own or paired with your favorite dipping sauces like marinara, ranch, or a spicy buffalo sauce.
- Prep Time: 30 minutes
Nutrition
- Serving Size: 16
- Calories: 100
- Fat: 6g
- Carbohydrates: 100G
- Protein: 5g
Conclusion of Fried Mac and Cheese Balls
Fried Mac and Cheese Balls are a mouthwatering snack that combines the best of comfort food with a crispy, golden exterior. With a creamy cheese filling and a crunchy coating, these balls are perfect for any occasion, whether it’s a casual family dinner, a party appetizer, or a fun snack. The best part is that they are Halal-friendly, so everyone can enjoy these crispy, cheesy delights without any worry. Try them today, and you’ll quickly see why they’re a favorite! Enjoy!