Introduction
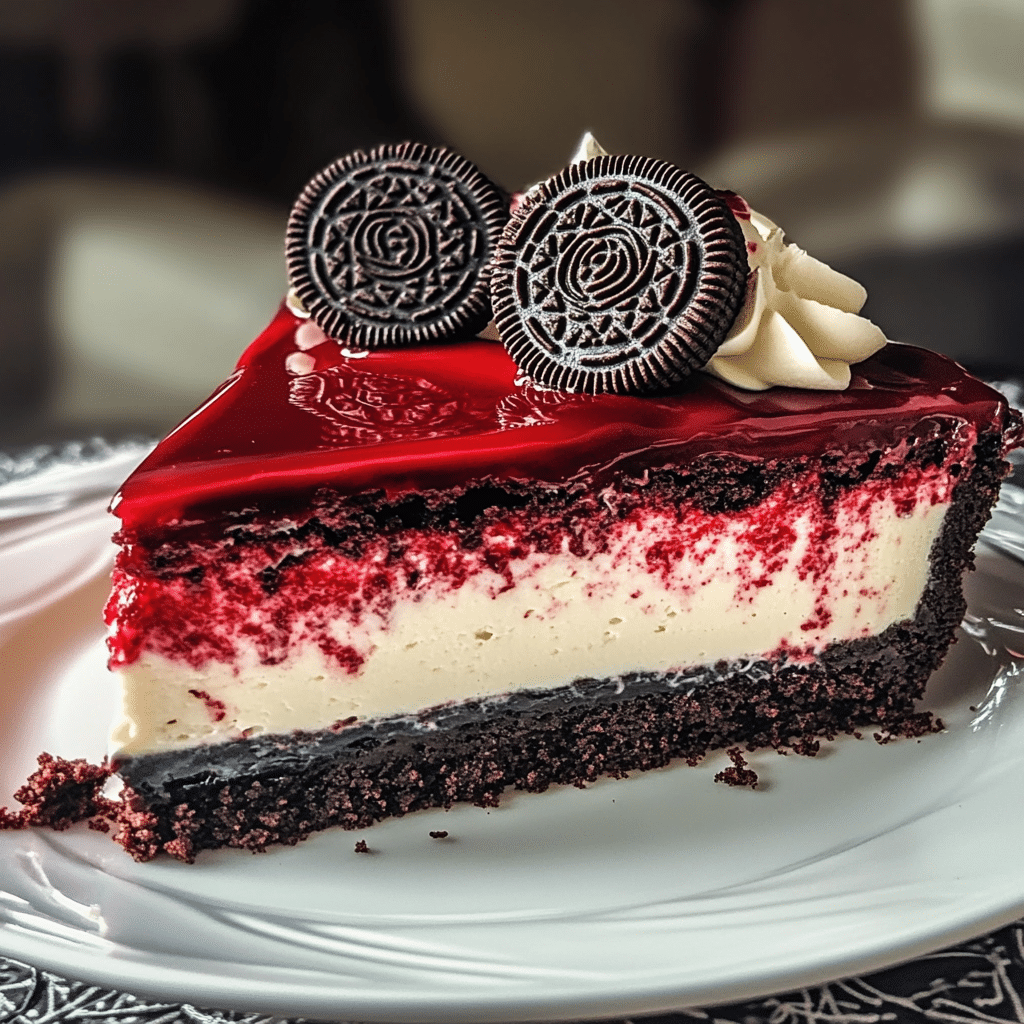
If you’re a fan of indulgent desserts that bring together the best of multiple worlds, then Red Velvet Oreo Cheesecake is about to become your new favorite treat. Combining the beloved red velvet cake with the rich, creamy texture of cheesecake, and the added touch of Oreo cookies for crunch, this dessert delivers an irresistible fusion of flavors. The vivid red color of the cake layer, the creamy cheesecake filling, and the crunchy Oreo crust come together to create a visually stunning and delicious dessert perfect for any occasion.
In this article, we’ll take you through why Red Velvet Oreo Cheesecake is a must-try, provide step-by-step instructions on how to prepare it, and offer some tips for customizing and serving it. Whether you’re hosting a party or looking for a special treat for yourself, this cheesecake is sure to impress.
Why You’ll Love This Recipe
- Delicious Fusion of Red Velvet and Cheesecake: This recipe blends the moist, velvety richness of red velvet cake with the smooth, tangy goodness of cheesecake.
- Crunchy Oreo Crust: The addition of an Oreo cookie crust adds a delightful crunch and flavor contrast to the creamy filling.
- Visually Stunning: The red velvet layer and the creamy white cheesecake filling create a striking, Instagram-worthy dessert.
- Perfect for Special Occasions: This cheesecake is ideal for birthdays, celebrations, or even as a holiday dessert. Its colorful appearance and rich taste will be a crowd-pleaser.
- Customizable: You can adjust the flavors and decorations to suit your taste, making it easy to put your own spin on this classic dessert.
Preparation Time and Servings
- Total Time: 5 hours (20 minutes for prep, 4 hours for chilling, 40 minutes for baking)
- Servings: This recipe yields approximately 12 servings, depending on how large you slice the pieces.
- Nutrition Facts (per serving): Calories: 400, Protein: 6g, Carbs: 40g, Fat: 25g.
Ingredients
Oreo Crust:
- 2 cups Oreo cookie crumbs: The base for the crust, giving a crunchy, chocolaty flavor that pairs perfectly with the cheesecake.
- ¼ cup granulated sugar: To sweeten the crust and balance out the bitterness of the cookies.
- 5 tablespoons melted butter: Helps bind the crumbs together and gives the crust a rich flavor.
Red Velvet Cake Layer:
- 1 ½ cups all-purpose flour: The main dry ingredient for the cake batter.
- 1 teaspoon baking powder: To help the cake rise and become light and fluffy.
- ¼ teaspoon baking soda: Aiding the red velvet cake in achieving its characteristic soft texture.
- ½ teaspoon salt: To enhance the flavors and balance the sweetness of the cake.
- 1 tablespoon unsweetened cocoa powder: For a subtle chocolate flavor that complements the red velvet color.
- 1 cup granulated sugar: Sweetens the cake while allowing the flavors to shine.
- 1 large egg: Provides structure to the cake.
- ½ cup buttermilk: Adds a tangy flavor and moisture to the cake.
- ½ cup vegetable oil: Keeps the cake moist and tender.
- 1 teaspoon vanilla extract: Adds depth to the flavor of the cake.
- 1 tablespoon red food coloring: For the signature red hue of red velvet cake.
- 1 teaspoon white vinegar: Reacts with the baking soda to enhance the cake’s texture and flavor.
Cheesecake Filling:
- 3 (8 oz) packages cream cheese: Softened, this forms the base for the creamy cheesecake filling.
- 1 cup sour cream: Adds richness and a slight tang that balances the sweetness of the cheesecake.
- 1 cup granulated sugar: Sweetens the filling, giving it a creamy texture.
- 4 large eggs: Essential for structure and to give the cheesecake its firm yet smooth consistency.
- 1 teaspoon vanilla extract: For flavor enhancement.
- ¼ cup all-purpose flour: To help stabilize the cheesecake and prevent cracks during baking.
- ½ cup heavy cream: Adds extra richness and smoothness to the cheesecake filling.
Optional Garnish:
- Crushed Oreos: For extra crunch and a decorative touch.
- Red velvet cake crumbs: For a festive and colorful finish.
- Whipped cream: For added richness and decoration.
Step-by-Step Preparation
FIRST STEP: PREPARE THE OREO CRUST
- Make the Crust: In a medium-sized bowl, combine the Oreo cookie crumbs, granulated sugar, and melted butter. Mix well until the crumbs are evenly coated with butter and the mixture resembles wet sand.
- Press the Crust: Press the crumb mixture firmly into the bottom of a 9-inch springform pan. Make sure it’s evenly distributed, pressing down with the back of a spoon or the bottom of a glass to pack it tightly.
- Pre-bake the Crust: Preheat the oven to 325°F (163°C). Place the pan with the crust into the oven and bake for 10 minutes or until it is set. Remove from the oven and let it cool while you prepare the red velvet cake layer.
SECOND STEP: PREPARE THE RED VELVET CAKE LAYER
- Mix Dry Ingredients: In a medium-sized bowl, whisk together the flour, baking powder, baking soda, salt, and cocoa powder. Set aside.
- Prepare Wet Ingredients: In a large mixing bowl, beat together the sugar, egg, vegetable oil, and buttermilk until smooth. Add the vanilla extract, red food coloring, and white vinegar, and continue to mix until combined.
- Combine Wet and Dry Ingredients: Gradually add the dry ingredients to the wet mixture, mixing just until incorporated. Be careful not to overmix.
- Bake the Red Velvet Cake: Pour the cake batter into the prepared springform pan, on top of the cooled Oreo crust. Smooth the top with a spatula to ensure an even layer.
- Bake the Cake: Bake at 325°F (163°C) for 25-30 minutes, or until a toothpick inserted into the center of the cake comes out clean. Allow the cake to cool completely in the pan.
THIRD STEP: PREPARE THE CHEESECAKE FILLING
- Beat the Cream Cheese: In a large mixing bowl, beat the softened cream cheese with an electric mixer until smooth and creamy. Scrape down the sides of the bowl as needed.
- Add Sour Cream and Sugar: Add the sour cream and sugar to the cream cheese, and beat until fully combined and smooth.
- Incorporate the Eggs: Add the eggs, one at a time, beating well after each addition. Be sure to scrape the sides of the bowl to ensure everything is well combined.
- Add Vanilla and Flour: Mix in the vanilla extract and flour, and beat until the mixture is smooth. Add the heavy cream and beat until combined.
- Layer the Cheesecake: Once the red velvet cake has cooled completely, carefully pour the cheesecake filling over the cake layer. Smooth the top with a spatula.
FOURTH STEP: ASSEMBLE AND BAKE THE CHEESECAKE
- Bake the Cheesecake: Preheat the oven to 325°F (163°C). Bake the assembled cheesecake for 45-50 minutes, or until the center is set but slightly jiggly. The edges should be firm and golden.
- Cool the Cheesecake: Turn off the oven and let the cheesecake cool in the oven with the door slightly ajar for about 1 hour. This gradual cooling helps prevent cracks.
- Chill the Cheesecake: Transfer the cheesecake to the refrigerator and chill for at least 4 hours, or preferably overnight, to allow it to fully set and develop its flavor.
FINAL STEP: GARNISH AND SERVE
- Garnish the Cheesecake: Once chilled and ready to serve, top the cheesecake with crushed Oreos, red velvet cake crumbs, and whipped cream for a festive and delicious presentation.
- Slice and Serve: Carefully slice the cheesecake using a sharp knife. Serve chilled, and enjoy the rich, creamy, and decadent flavors of red velvet and cheesecake with the delightful crunch of Oreos.
How to Serve Red Velvet Oreo Cheesecake
Red Velvet Oreo Cheesecake is a versatile dessert that can be served in various settings. Here are some great serving ideas:
1. As a Special Occasion Dessert
This cheesecake is perfect for special occasions like birthdays, anniversaries, or holiday celebrations. Its vibrant color and delicious flavor make it a standout dessert.
2. Pair with Fresh Fruit
To balance the richness of the cheesecake, serve it with fresh fruit like berries, strawberries, or a citrus medley. The freshness of the fruit contrasts beautifully with the creamy cheesecake.
3. Serve with Coffee or Tea
Red Velvet Oreo Cheesecake pairs wonderfully with a cup of hot coffee or a flavored tea. The bitterness of coffee and the warmth of tea enhance the sweetness and richness of the dessert.
4. As a Holiday Dessert
This cheesecake makes an excellent addition to your holiday dessert table. Whether it’s for Christmas, Thanksgiving, or Valentine’s Day, it’s sure to impress guests with its stunning appearance and delicious flavor.
Additional Tips
- Make Ahead: You can make Red Velvet Oreo Cheesecake in advance. Simply prepare it a day or two before the event, allowing it to chill properly before serving.
- Freezing: This cheesecake freezes well. After baking, let it cool completely, then wrap it tightly in plastic wrap and foil. Freeze for up to 3 months. To reheat, let it thaw in the refrigerator overnight before serving.
- Spicy Kick: If you enjoy a bit of spice, try adding a pinch of cinnamon or nutmeg to the red velvet cake batter.
- Gluten-Free Version: For a gluten-free version, substitute the regular flour with a gluten-free flour blend and use gluten-free Oreos for the crust.
Recipe Variations
While Red Velvet Oreo Cheesecake is fantastic as written, you can easily adapt the recipe to suit your tastes. Here are some ideas:
1. Use Different Cookies for the Crust
While Oreos are the traditional choice for this recipe, you can experiment with other cookies such as chocolate chip cookies, Biscoff cookies, or even graham crackers for a different flavor profile.
2. Make it Mini
To make individual portions, prepare mini cheesecakes in muffin tins with cupcake liners. This makes them perfect for parties or events where guests want to grab a personal serving.
3. Add a Layer of Ganache
For an extra indulgent touch, drizzle the top of the cheesecake with a layer of chocolate ganache. The rich chocolate flavor will pair beautifully with the red velvet and Oreo layers.
Freezing and Storage
Red Velvet Oreo Cheesecake can be stored in an airtight container in the refrigerator for up to 5 days. For long-term storage, it can be frozen for up to 3 months. Simply wrap it tightly with plastic wrap and aluminum foil before freezing. To serve, thaw it overnight in the refrigerator.
Special Equipment
You will need a few kitchen essentials for this recipe:
- Springform Pan: This is essential for cheesecakes, as it allows for easy removal and a clean, beautiful presentation.
- Mixer: An electric mixer helps ensure the cheesecake filling is smooth and creamy.
- Spatula: Useful for spreading the cheesecake layer evenly and scraping down the sides of the bowl.
- Oven Thermometer: To make sure your cheesecake bakes evenly and doesn’t overcook.
Frequently Asked Questions
- Can I make this cheesecake ahead of time? Yes! Red Velvet Oreo Cheesecake can be prepared up to 2 days in advance. Make sure to store it in the refrigerator until ready to serve.
- Can I use a different color for the cake? Yes, you can substitute the red food coloring with any other color if you prefer a different hue for your cheesecake.
- Can I use store-bought red velvet cake for this recipe? While it’s best to bake the red velvet cake from scratch for the freshest flavor, you can use store-bought red velvet cake mix in a pinch.
- How do I prevent the cheesecake from cracking? To avoid cracks, bake the cheesecake at a low temperature, and allow it to cool gradually in the oven before chilling in the fridge.
Conclusion
Red Velvet Oreo Cheesecake is the perfect dessert for anyone who loves a decadent treat with a stunning appearance. With its combination of rich cheesecake filling, soft red velvet cake, and crunchy Oreo crust, this dessert is sure to impress at any event. Whether you serve it for a holiday celebration or a special occasion, it’s guaranteed to delight everyone who tastes it. Try this recipe today and enjoy a slice of indulgent, colorful goodness!